About Me

My photo
I currently live in Birmingham and come from Solihull. I have a love of all things crafty, developed from my mom's love of crafts as I was growing up. I currently work in marketing, but I'm a qualified Aromatherapist, and use to be self employed alongside a day job, might one day return to that. I try to fit in crafts when I can, I wish I had more time and money to spend on it! I enjoy researching my family history and finding out about the past. It can get frustrating, but is really rewarding when you have a break through! I hope to meet people with similar interests as me and swap advice/stories.
Showing posts with label home. Show all posts

Friday, 19 October 2012

Mary Berry Queen of Cakes

Baking again- this time inspired by The Great British Bake Off (I was backing Brendan!)

So I dug out a Mary Berry cake book, selected a few recipes to have a go at and here's the first one!

A twist on Devonshire Apple Cake, I added some pears to the cake as well as apples and omitted the almond essence.

450g of cooking apples (if making just an apple cake) or for an apple and pear cake, 2 apples and 2 pears
juice of 1/2 lemon
350g self raising
2 teaspoons baking powder
350g caster sugar (I used part golden caster sugar)
4 eggs
225g butter, melted
1-2 teaspoons of mixed spice (optional)

 Pre heat oven 180C / 350F / Gas 4
Grease and line 12 x 9 inch (30 x 23cm) roasting tin with greased greaseproof paper.


Peel and core apple and pear, thinly slice, squeeze lemon juice over them.
Place flour, baking powder and caster sugar into a large bowl. Beat the eggs together and stir into the flour with the melted butter.


Mix well then spread half the mixture into the tin. Arrange apples and pears over cake mixture.
Pour rest of the mixture over the top.


Bake for up to 1 1/4hrs (mine took around 55 minutes) Check the cake until it is golden brown, with a spring touch.


Leave to cool for 15minutes. Turn out and remove paper.


You can serve the cake hot with custard, ice cream or yoghurt, or leave to cool and eat on its own.


This is a really light, moist cake and the fruit tastes really nice.

Enjoy!


Thursday, 28 June 2012

How does your garden grow?

I was lucky to grow up with a large garden at home, plenty of room to have adventures, explore and build dens, also played football and tennis...although often remember being told off for the football hitting the window, the flower beds, going in the pond...and next door!

My parents are mad on plants and they are everywhere, but now I'm getting into gardening, I don't think I'll ever has as a big a garden (1. it's a lot of work and 2, you rarely have houses with that size garden these days.)

Even though I'm in a flat we have plants growing, despite the small space and I thought I'd show you what we have.

 The kitchen window sill - basil and lemon verbena. The basil is in a decoupaged flower pot, vintage feel black, gold and white floral pattern with a hand painted black rim.

(There is myrtle plant there too, but it some how fell out the window of a top floor flat and it's not looking too good now so I avoided photographing that!)

The juilet balcony with a selcetion of plants including:
Thyme, tomato plants, rosemary, lavender, lettuce and radish


We also have a basket holding sweet williams, chives and a small white flower, the name now eludes me...something about snow!


The Sweet Williams are flowering!


So, as you can see, even tiny spaces can produce healthy plant life! We even have a bird feeder on the window and have a lot of visitors, although since the starlings discovered us the robin and others haven't been around much (or at least not when I've been in!)

Hopefully my next move will allow me to have a herb garden, fruit and vegtables, a small pond and mini wild garden and some beautiful flowers!! Alongside space to sit and enjoy it! (Here's hoping)


What about you? Are you green fingered?

Wednesday, 21 March 2012

Make Do and Create Part 2

Well as part of my last blog I did agree to challenge myself to use some of the craft supplies I already have, and I made a few things and have a few in the pipe line!


From this....
To this!!! A lavender and hop scented doormouse! I made several of these for Christmas gifts and still had the fabrics left over (velveteen) so I made another one and plan to make more using the vintage fabric scraps I have left. I have several scattered around my bedroom, very handy and the hops are from last years crop- home grown in my parents garden!

These lovely birds are also scented, I used the felt I had brought about a month ago and then the larger bird has vintage fabric for its wings. The eyes ar glass pearls (part of my never ending bead collection.)
These can by hung up in your wardrobe or around the house for decoration- not decided whether to sell these or keep them!

This next creation is partly new,  have been making stud earrings and hair clips recently and after hunting through my button jar I found these pink flower buttons and thought they'd make great earrings, simple but fun and a lovely colour. I will be listing this in my shop when I get time! I have also made some lovely vintage accessories (see my etsy shop.)


Now I do plan to make more and use what I have...however the NEC craft show is approaching so I know I will be buying bits (making a list) but I will try to incorporate items I have already. So this challenge is on going and I will be 'destashing' so please keep an eye out for any bits you think you might be able to make use of!

Wednesday, 15 February 2012

British Sellers On Etsy

Here are some fab British crafters selling their items on www.etsy.com they are all very creative and have some wonderful and unique designs ideal for gifts, the home and treats for yourself. Why not go and take a look...you never know what you might find!

Wednesday, 14 December 2011

A Handmade Christmas

Over the past few years, each Christmas myself and my family have been breaking away from the standard Christmas decorations in favour of more unique handmade crafts- both brought from craft fairs and items we crafted ourselves.

There are so many ways you can go with decorating your home and so many wonderful things to make and buy that really you are spoilt for choice, this year there is defiantly a more vintage and traditional feel- with a few modern touches. Take a look!


 Wreath- made with real holly, ivy, beautiful tree branches, mistletoe and even some hand-dried oranges. Simply buy a plain wreath (ours was wicker) and using gardening green wire attach the various components layering up the wreath as you go. Additional items can be added such as the dried orange slices (cut an orange into slices and roast in the oven at the lowest temperature for several hours). Complete the wreath with some optional ribbon and bows.


Paper chains – so simple, take any paper, cut into strips and loop together. We used some old vintage styled scrapbook paper that hadn’t been put to use.


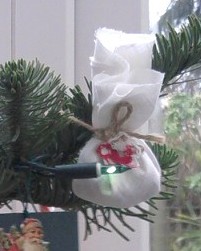
Scented Christmas ‘baubles’ – these not only look vintage-like but have a wonderful aroma which you can choose to match your own tastes, we used a mixture of dried cloves, juniper berries and star aniese.  Take some fabric (we used white linen and hessian) cut into circles, place your herbs etc into the centre of the fabric pull fabric together and tie thread or ribbon around to hold it together. To attach to the tree use wire, attach to the ‘bauble’ at the back and make a loop, hook onto the tree. As an option you can decorate the ‘bauble’ or leave plain.

 Decoupage tree decorations – another quick and easy decoration. Using rectangles of card (red and green colours) add a Christmas themed image to the card (optional on both sides) add a little glitter, make a hole at the top and thread some ribbon through to make a loop- hang on the tree! 


Pom Pom ‘Snowballs and Icicles’ – use a pom pom maker, or make your own circle for creating pom poms. We made blue pom poms to represent ice and white for snowballs. Make the pom poms in various sizes and ensure they have a loop on them. You can use them in various ways; I simply attached them to some stretch magic and hung them by the window for the illusion that they are falling. 


There's still time to try some of these crafts!!

Please look out for my follow up blog on handmade Christmas gifts…it’s a little too early to be giving them away yet, but I have managed to make a few this year and possibly receive them too? (well I have been good this year!)